Digital Geochron
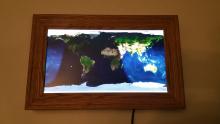
My Dad (K2GC) and I were looking around for a greyline map to use in the shack so we could see what time it was around the world and see we could see what HF propagation was avalibale. So we got to looking online and founf this really cool thing called a Geochron, a mechanical greyline clock. there was one catch though... said greyline clock had a price tag of about $3000... not in the budget. So we started looking for a cheaper way to do the same basic concept.... A raspberry PI.
Here are the instructions on how we did it and some pictures:
Required Hardware:
-
Raspberry Pi, model doesnt matter, but wifi is nice to have
-
HDMI Capable display (or HDMI to VGA adapter)
-
Power supply for Raspberry Pi
You will need to have an install of Raspbian on your SD card to do this. Instructions to do this are at this link: https://www.raspberrypi.org/documentation/installation/installing-images/README.md
Please note as with all flavors of Linux all of the following commands are CASE sensitive.
First lets install the ntp server with the following command:
sudo apt-get install ntp
Now we have to enter the next group of commands to stop the current time sync, then disable it, and start the new ntp service.
sudo systemctl stop systemd-timesyncd
sudo systemctl disable systemd-timesyncd
sudo /etc/init.d/ntp stop
sudo /etc/init.d/ntp start
Now lets edit the ntp configuration file (if desired) to set the time servers.
sudo nano /etc/ntp.conf
Scroll down until you find 4 lines that look like this:
server 0.us.pool.ntp.org
server 1.us.pool.ntp.org
server 2.us.pool.ntp.org
server 3.us.pool.ntp.org
These are the default servers for the United States. If you live somewhere else you can go to this website: https://www.ntppool.org/en/ and click on the continent you live in on the far right, then it will give you a menu to choose the country you live in (or close to) then at the top of the webpage is the server addresses you can copy.
Hit CTRL-X then Y then enter to exit and save.
If you have made changes to file you need to restart the ntp service:
sudo /etc/init.d/ntp restart
A reference on how to do this and some more information can be found at: http://raspberrypi.tomasgreno.cz/ntp-client-and-server.html
If all of this has been done correctly your pi’s time should set itself correctly a minute or two after you boot the pi.
Now we want to hide the mouse pointer so it isn't in your map:
sudo apt-get install unclutter
This will hide your mouse pointer on boot after we add it to the file.
Next we will install sunclock:
sudo apt-get install sunclock
If you want the pi to auto-start sunclock on boot we need to make a script to do so, and then edit the auto-start file for the pi to run the script.
Let’s create and edit the file:
sudo nano /home/pi/sunclock_startup.sh
#!/usr/bin/sh
Sleep 8
/usr/bin/sunclock -twilight -image /usr/share/sunclock/earthmaps/jpeg/big/photo_big1.jpg
Sleep 2
unclutter -display 0:0 -noevents -grab
Once are finished with your script use CTL-X to close the file and then press Y to confirm it.
Note: the -image and file following it refer to the map that I chose to use. You may need to locate and download this file if you want to use it. You can eliminate the -image and its file from the script if you wish to use the default map. More information on the usage of sunclock can be found here: http://manpages.ubuntu.com/manpages/trusty/man1/sunclock.1.html
The map images we used came from here:
You have to download this to the pi and when this has been done go to your command terminal and type:
sudo pcmanfm
When that has been done go to “downloads” and right click on the “tar” file and click extract to.
Then type in:
/usr/share/sunclock/earthmaps
And hit extract this will give you the picture for your map
Now we have to make the file executable with the following command:
sudo chmod +x /home/pi/sunclock_startup.sh
Now that we have a script to use, we need to add it to the pi’s autostart file.
Edit the file:
sudo nano ~/.config/lxsession/LXDE-pi/autostart
And add this line at the end of that file:
@bash /home/pi/sunclock_startup.sh &
Again, we will use CTRL-X to close the file, and Y to confirm saving it.
Finally, if we want Sunclock to start maximized and with no title bar we will have to edit the window manager preferences.
sudo nano ~/.config/openbox/lxde-pi-rc.xml
Lets search the file with CTRL-W, with the search term:
<applications>
After the last </application> entry add the following:
<application class=”Sunclock”>
<maximized>true</maximized>
<decor>no</decor>
</application>
And one last time, CTRL-X to close, and Y to confirm saving.
Now go to your terminal and enter:
Sudo apt-get install xscreensaver
When we install this we can go into preferences then screensaver. And disable the screensaver in “modes”
Now right click on the task bar and click “panels settings” go to advanced and check minimize when not in use and set panel size to 0.
Reboot your pi, and it should auto-start Sunclock, maximize it, and make it take up the full screen.
The final product.
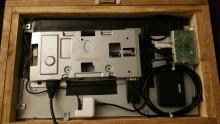
The back of the geochron.
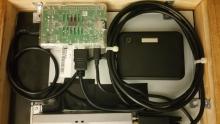
Closeup of the pi
Hope you ;ike it!
73s
N2WES
Wesley
If you have any questions you can email me at: wesley@n2wes.com


